Goal of this exercise: Analyze the first study that used the CRISPR Cas9 system to successfully knock out an abnormal gene in human patients (Gillmore et al. 2021). Part 2 will determine whether the guide RNA sequence published by Gillmore et al. 2021 allows Cas9 to make a cut in the DNA at that site, using DNA from chromosome 18 and also DNA from the entire human genome.
Part 1: Overview of ATTR, CRISPR, and Gillmore et al. 2021
Part 2: Cut the TTR gene with Cas9 under the direction of guide RNA
Part 3: Look for potential off-target effects of Cas9
Part 4: Examine mutations of patients associated with the study
Part 5: Analyze frameshift mutations in monkeys and humans
Overview of Part 2
Case It v7.0.4 will be used to digest a 1M bp portion of chromosome 18 containing the TTR gene. The resulting fragments will be run on gel and the cut location determined. The entire 80M bp sequence of chromsome 18 will then be downloaded and digested to verify that only one cut site is present for the guide RNA sequence used by Gillmore et al. 2021. The site will then be located and visualized in its double-stranded configuration using the NCBI Genome Data Viewer.
Organization of Part 2
Steps 2-20: Digest a portion of chromosome 18 with guide RNA/Cas9, and run on gel
Steps 21-36: Digest an entire chromosome with the Cas9 enzyme complex
Steps 37-44: Use NCBI Genome Data Viewer to visualize Cas9 target site
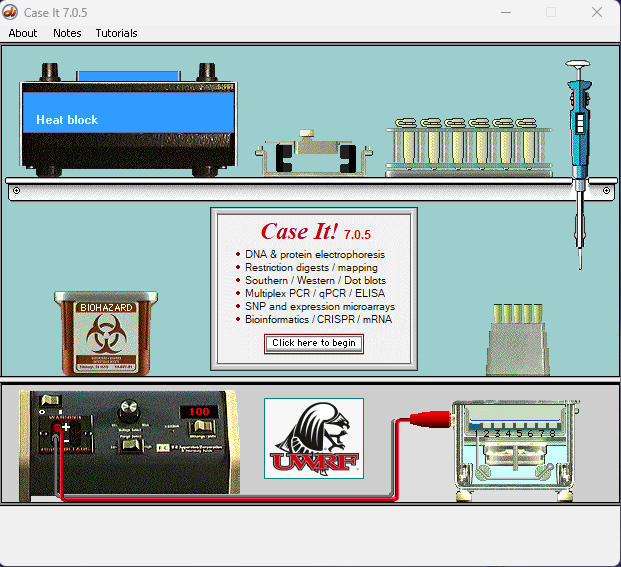
1. If you have not already done so, download Case It v7.0.5 and follow the instructions on the PDF file to install it either on the Windows or Mac operating systems. The splash screen is shown below (click to enlarge). Click the button on this screen, which leads to a second informational screen. Clicking the button on that screen will take you to the main screen of the program, called the ‘Data Screen’.
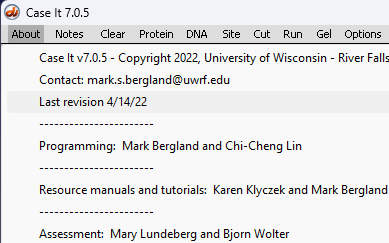
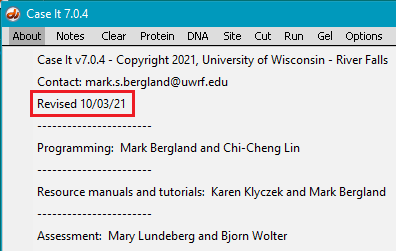
This exercise requires a version of Case It dated 10/03/21 or later. Use the About menu in the upper left-hand corner of the screen to determine the date of the version you are using (see second image below). If necessary, download the latest version before continuing.
If you are using Case It on a Mac, read these instructions for accessing files.
DIGESTING A PORTION OF THE CHROMOSOME 18 SEQUENCE
Goal of Steps 2-20: To determine if Cas9 can digest a portion of the chromosome 18 sequence containing the TTR gene, using the guide RNA sequence published by Gillmore et al. 2021, and run a gel.
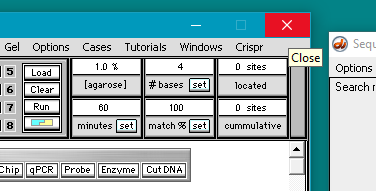
2. If Case It v7.0.4 is already open, use the Clear menu and select Clear > Clear everything? > Yes.
3. Change the timer setting from the default of 60 minutes to 400 minutes.
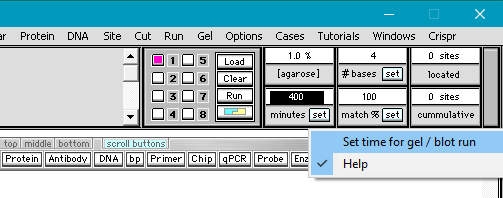
Note: We need to increase the timer setting to separate large fragments later in this exercise, so that is the reason for changing the default of 60 to 400. We will be using large DNA sequences, too large to run on the kind of standard gel that Case It v7.0.4 simulates. In reality, sequences greater than ~20kb (20,000 base pairs) are run using Pulsed Field Gel Electrophoresis (PFGE). This technique can separate sequences up to 10 Mb in size (10 million base pairs). Here is a video that explains the difference between standard gel electrophoresis and PFGE.
4. Click the DNA buttton on the silver button bar and navigate to the TTR folder that is inside the Case It folder. Select the file DNA TTR 1000644.txt, and click the Open button (or double-click on the DNA file).
Note: This file contains a portion of the chromosome 18 sequence that includes the TTR gene, with 1,000,644 characters representing nucleotides.
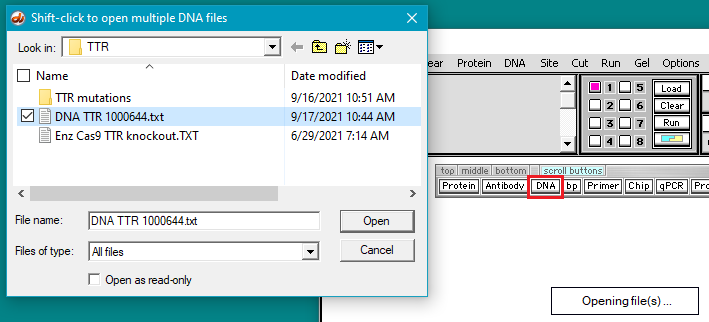
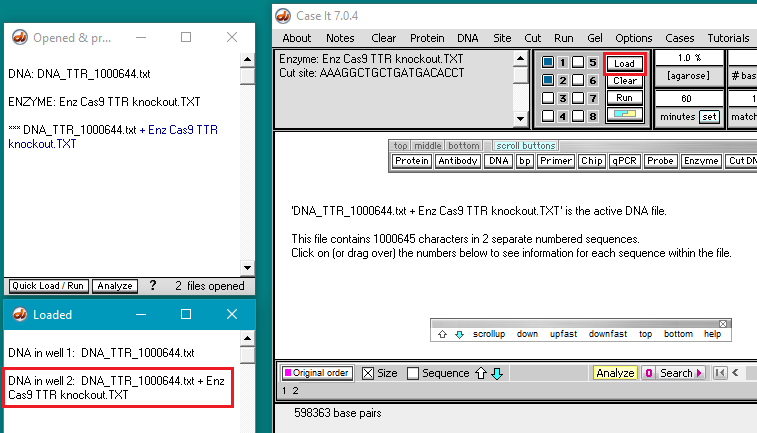
5. The filename appears in the Opened & processed window. Click the Load button (red square below) to load this file into well one. The white button next to the number 1 will turn blue, and a message will appear in the Loaded window indicating that well 1 contains the contents of the file.
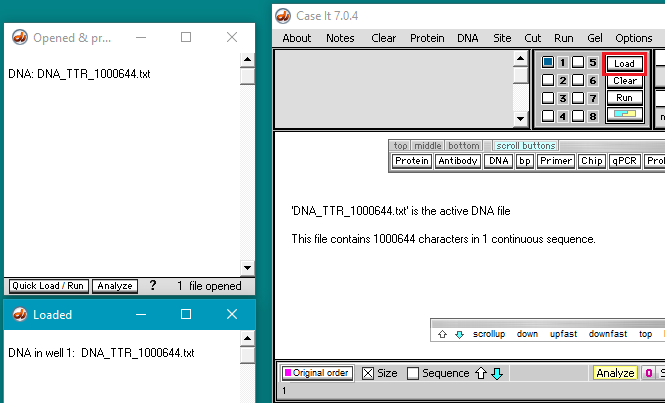
Question: Why should this undigested DNA sequence be loaded into a well?
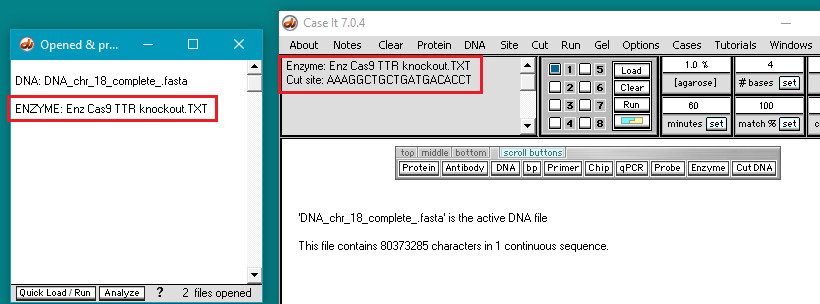
6. Click the Enzyme button and open the file Enz Cas9 TTR knockout.TXT.
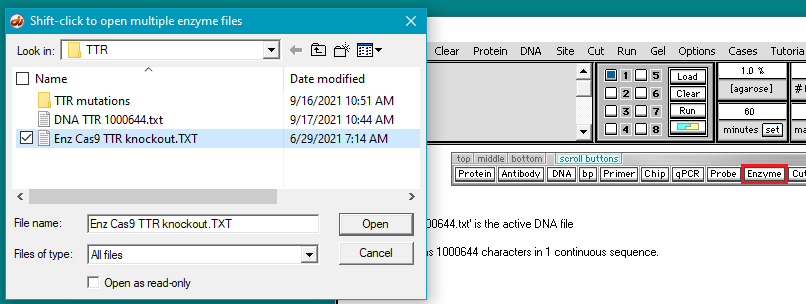
7. The filename appears in the Opened & processed window, and the contents of the file appear in the upper-left corner of the main screen. This file contains the DNA sequence on the ‘non-target strand’ corresponding to the guide RNA spacer sequence used by Gillmore et al. 2021 (see Part 1).
Note: Case It v7.0.4 searches the non-target strand because this is the side of the DNA molecule where the PAM would be located. Recall from Part 1 that guide RNA targets the 3′-5′ DNA strand, but the PAM sequence is on the 5′-3′ non-target DNA strand. Cas9 will not cut DNA unless the PAM is present.
To illustrate, here is how Gillmore’s guide RNA sequence would attach to the target strand of the DNA molecule, if a PAM sequence was present immediately adjacent to the 3′ end of the ‘non-target strand’. Under these conditions, Cas9 would cut three base pairs upstream (towards the 5′ end) of the non-target strand. 
A different example is shown below, modified from Jinek et al. 2012 to show current terminology for the two DNA strands. The ‘guide RNA spacer sequence’ is part of guide RNA, shown below as a duplex consisting of crRNA bound to tracrRNA (‘dual guide RNA’). Gillmore’s team used a ‘single guide RNA’ (sgRNA) with the crRNA and tracrRNA joined together by a tetraloop – see Part 1 for an illustration. Case It software only uses the 20 bases on the ‘non-target strand’ to search DNA, but in a real experiment the entire guide RNA / Cas9 complex would have to be present.
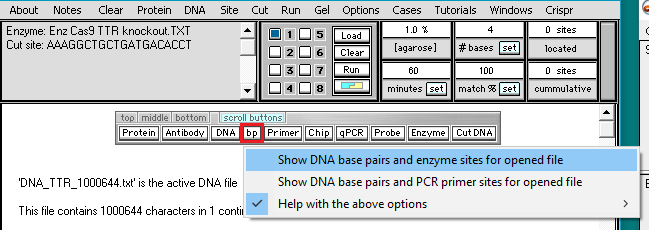
8. Click the bp button and select Show DNA base pairs and enzyme sites for opened file.
Note: This optional command enables you to see the location of any cut sites in the double-stranded configuration, before carrying out the digestion. It is not a necessary part of the procedure for digesting a DNA sequence. It is used here to show how guide RNA target sites are designated on a DNA sequence.
9. The Base pairs window appears, with the first 60 bp of the active DNA sequence (DNA_TTR_1000644.txt) appearing in its double-stranded configuration. Click the Find all sites button…
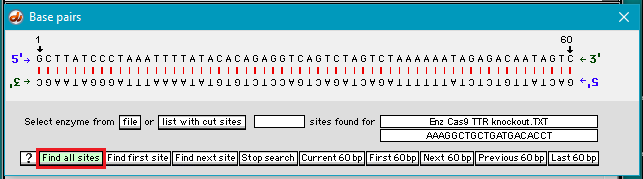
…and the location is found with the Cas9 cut site highlighted in blue/yellow. If there is a 100% match and a PAM site is present, the software shows the first 17 bp in blue and the last 3 bp in yellow, with the cut site in between. (If no PAM site had been present, the sequence would have been highlighted in gray rather than in blue/yellow.)
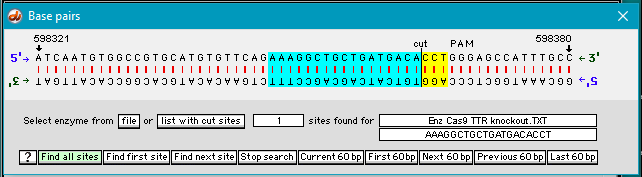
Case It searches for the ‘standard’ PAM sequence (NGG, with N standing for any of the four bases). In this particular case, the PAM site is GGG, which meets the requirement. Gillbert’s team used the standard PAM sequence, but other sequences can be used depending on the situation.
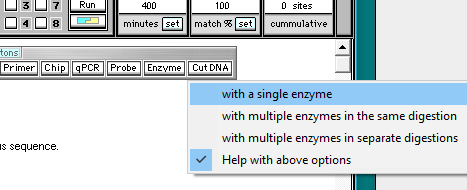
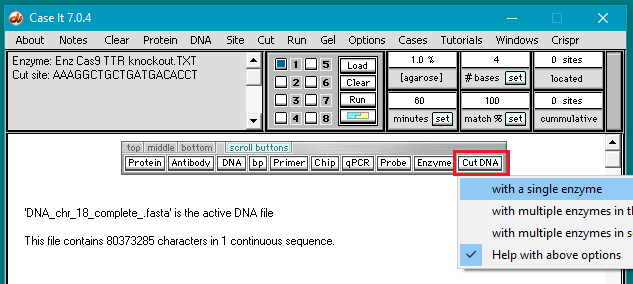
10. Close the Base pairs window, then click the Cut DNA button and select with a single enzyme.
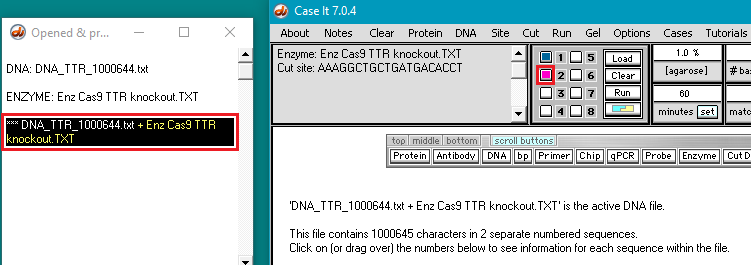
11. A new line appears in the Opened & processed window, preceded by three asterisks (***) representing a digested sequence. Click this line to make the digested sequence the active file, then click the box next to the number 2 as shown below. The box will turn pink, indicating that well 2 has been selected for loading.
Note: You didn’t have to do this for well one because that well is automatically selected by default when the program first opens.
12. Click the Load button, and the button turns blue indicating that well 2 has been loaded. A new line appears in the Loaded window giving the contents of well 2.
Note: For future reference, the smaller button bar in the image above can be used to go quickly through large DNA sequences, and to show the beginning (top) and end (bottom) of a sequence. Use the bottom button if you have any difficulty seeing the end of a sequence.
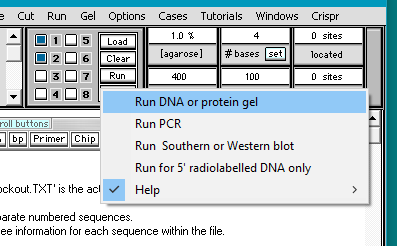
13. Click the Run button and select Run DNA or protein gel. Before doing so, make sure that the timer is set to 400, as described in Step 3 above.
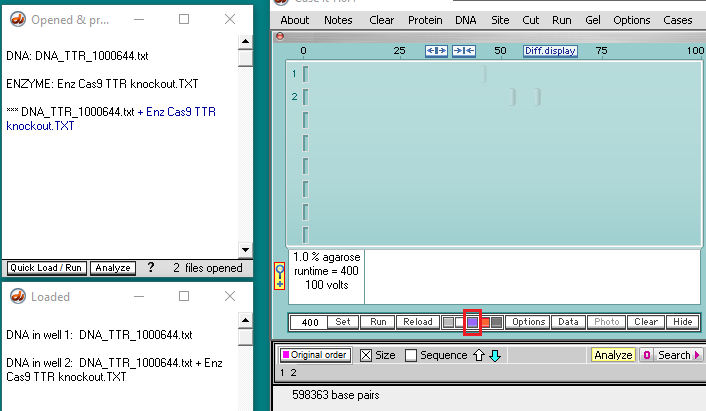
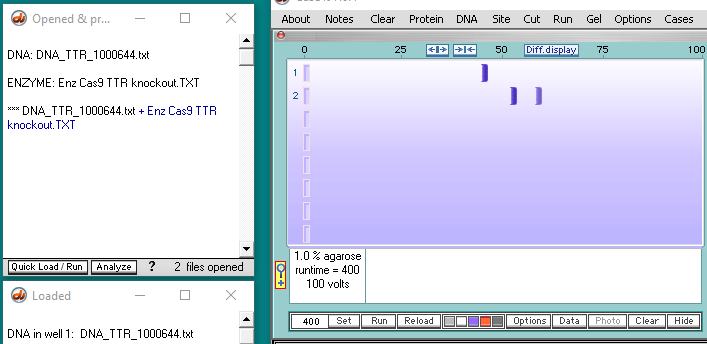
14. The gel appears with a single band in lane 1, and two bands in lane 2. The bands are faint, so click the purple button below the gel to make them more visible (second image below).
Goal of steps 15-20: To verify that Cas9 cut at the location shown in Step 9 above, by comparing the sequence at the very end of the first fragment with the sequence at the very beginning of the second fragment. By ‘fragment’, we mean the DNA sequence associated with a band, since the original DNA molecule was cut into two fragments by the action of Cas9.
15. Click the first band in lane 2 and it will turn red, with its size shown in the field below the gel (598363 base pairs).
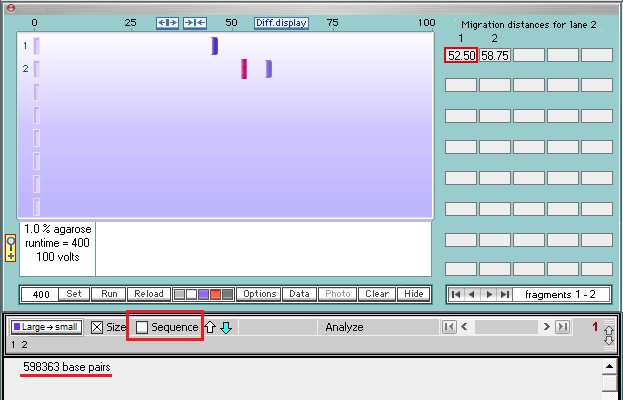
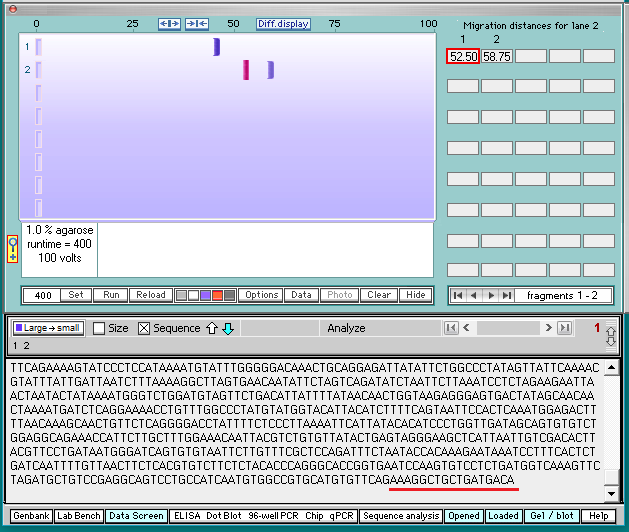
16. Click the sequence box on the gray bar, and the bottom of the sequence associated with the first band will appear. Note that the last 17 characters are AAAGGCTGCTGATGACA (underlined in red).
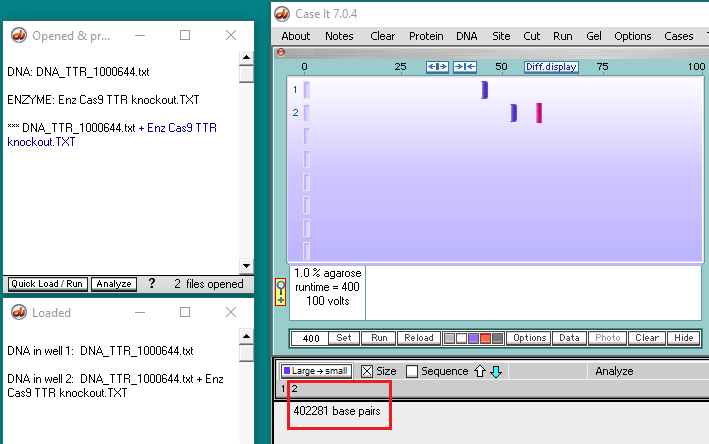
17. Click on the second band in lane 2 to reveal its size (402281 base pairs).
18. Click the sequence box on the gray bar, then use the scroll bar to scroll to the top of sequence associated with the second band.
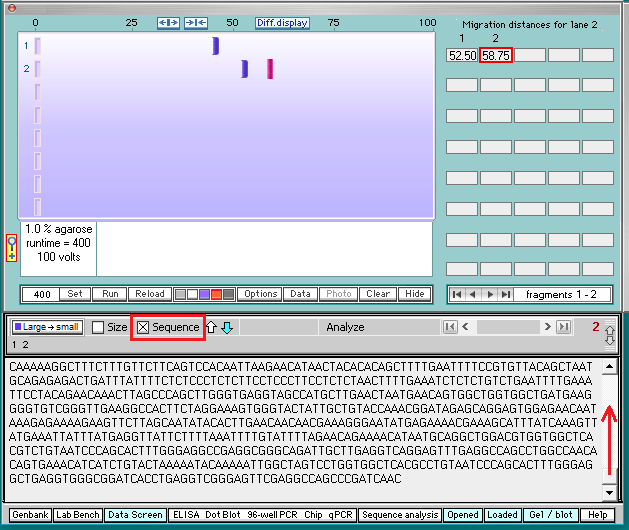
19. Note that the first six characters at the top of the sequence are CCTGGG. Then click the Hide button to hide the gel.
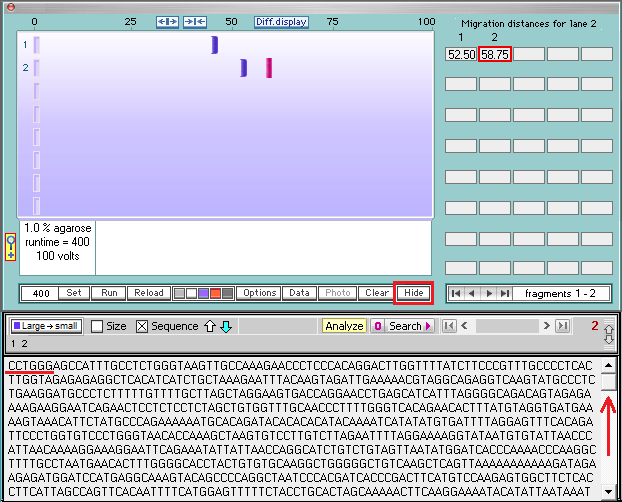
20. The last 17 characters of the first fragment are AAAGGCTGCTGATGACA (Step 16), and the first six characters of the second fragment are CCTGGG. Compare this with the enzyme target sequence at upper left in the image below.

Questions: Why was the DNA sequence cut at this particular location? What three other ‘standard’ PAM sequences could have enabled Cas9 to cut at this location?
DIGEST AN ENTIRE CHROMOSOME WITH THE CAS9 ENZYME COMPLEX
Goal of Steps 21-36: To download and digest the entire DNA sequence for chromosome 18, using the guide RNA sequence published by Gillmore et al. 2021.
In the previous steps a relatively small portion of chromosome 18 containing the TTR target DNA was used as the substrate for the cas9 enzyme. In reality, the entire genome would be present in the experimental sample. To more accurately simulate these conditions, we will repeat the above experiments using all of chromosome 18. We don’t use the entire genome in these steps because the file sizes become too hard to manage, but using all of chromosome 18 more closely resembles a real experiment.
21. Quit Case It v7.0.4 (by clicking the close box), then restart it. This is required because the next file that you will be working with is very large, making it necessary to have a fresh start*.
*Note: Chromosome 18 has a sequence in excess of 80 million bp. Case It v7.0.4 can open and digest a sequence this large, but sequences over ~2.67 million bp cannot be displayed by the software. The current version has an error-trapping feature that prevents the display of characters when files are very large, to keep the program from freezing. To see when the version you are using was uploaded, access the About menu as shown below. It should have a date of 10/03/21 or later. If necessary, download the latest version before continuing.
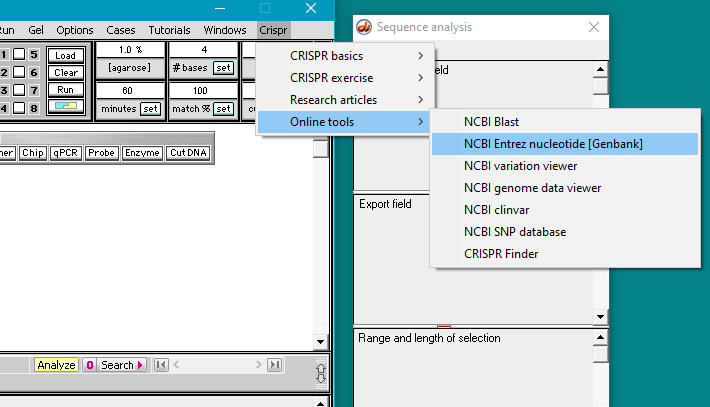
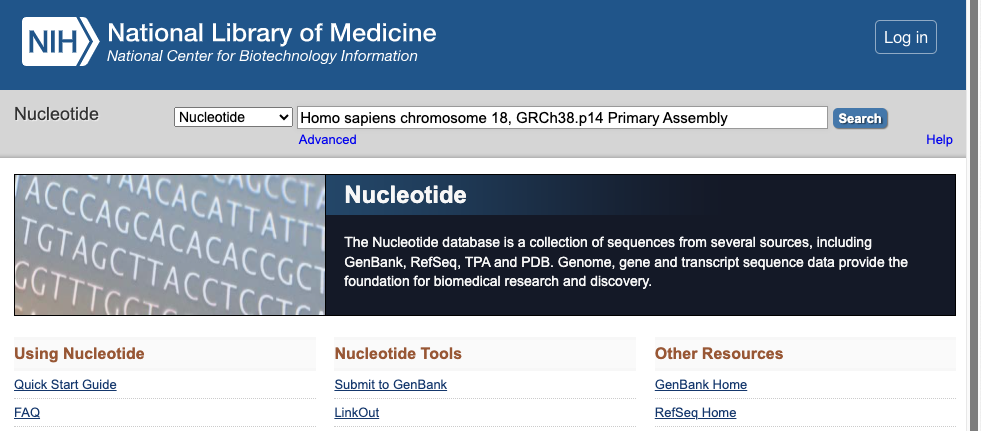
Next, you need to go to the Entrez nucleotide (Genbank) page of the NCBI web site. To do this, you can either use the CRISPR menu as shown below, or else right-click on this link, and select ‘open in new tab’ or ‘open in new window’.
Note: If your browser had been closed, Case It would automatically open the browser and direct it to the web site you select. If you are a Windows user, Case It may open Internet Explorer even if that is not your default browser. If that causes any issues, simply right-click on the link above to go to the Entrez nucleotide (Genbank) site.
22. Copy and paste the line below into the search field of that page, then click the Search button.
Homo sapiens chromosome 18, GRCh38.p14 Primary Assembly
Note: GRCh38.p14 is an abbreviation for the latest build of the human genome. A primary assembly is a collection of DNA sequences that when “assembled” represent a haploid human genome. More information on assemblies can be found here.
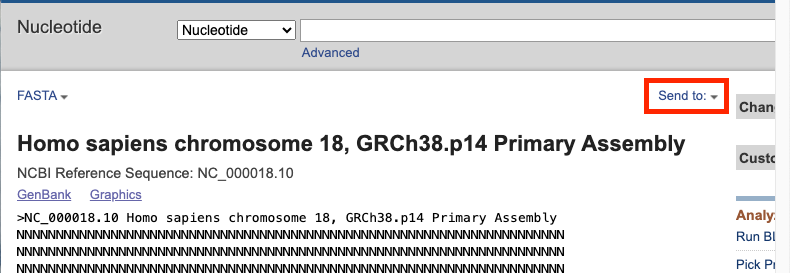
23. A page will appear with results. Scroll down on this page to the first entry, and click on it.

24. A link to the entire sequence for chromosome 18 appears. The sequence has 80,373,285 characters, the equivalent of a word processor document with 19,600 pages. Click on the FASTA link on the far left side.

Note: FASTA simply refers to the file format. FASTA files consist of a header line designated with a ‘>’ symbol, followed by the name and other information about the sequence. This header line is recognized by DNA analysis programs as being information about the sequence rather than the sequence itself. The actual DNA sequence starts on the next line after the header line. In the chromosome 18 sequence, the first several hundred to thousands of letters are N’s. This means that this sequence couldn’t be accurately determined. The informative sequences (ATCGs) are found later on the file.
Question: Consider the amount of information in a word processor document with 19,600 pages. Chromosome 18 is one of the smaller chromosomes, containing only about 2.6 percent of the total information in the human genome. How many pages would it take to write out the entire human genome?
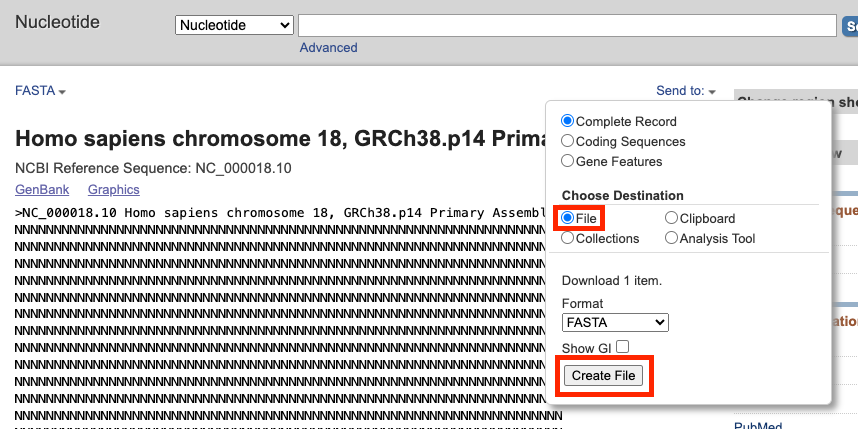
25. Click the Send to link..
26. …and select File as the destination, leaving the format as FASTA. Then click the Create File button.
27. Depending on the speed of your Internet connection, it may take a while to download the file because of its very large size. The name of the downloaded file is ‘sequence.fasta‘.
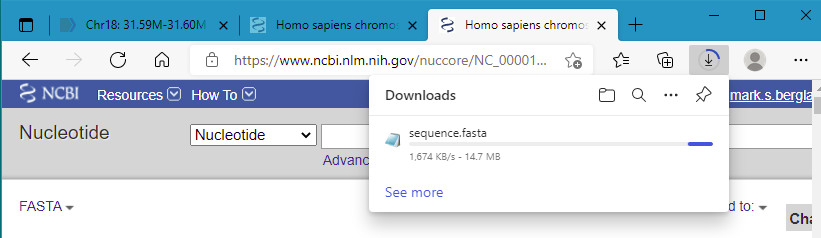
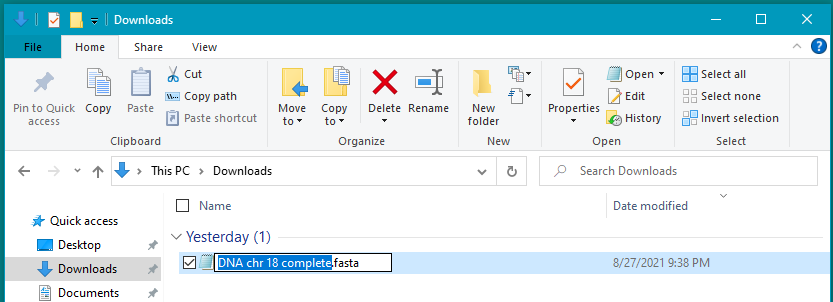
28. Locate the sequence.fasta file in your Downloads folder, and change the name to DNA chr 18 complete.fasta. After renaming the file, move it to your desktop. It is necessary to start the filename with the letters ‘DNA’ so that Case It v7.0.4 can recognize it as a DNA file.
Note: Your downloads folder may be in a different location, depending on the browser and operating system that you are using. The screenshot below is from Windows 10. If in doubt, use the search feature of your operating system and search for Downloads.
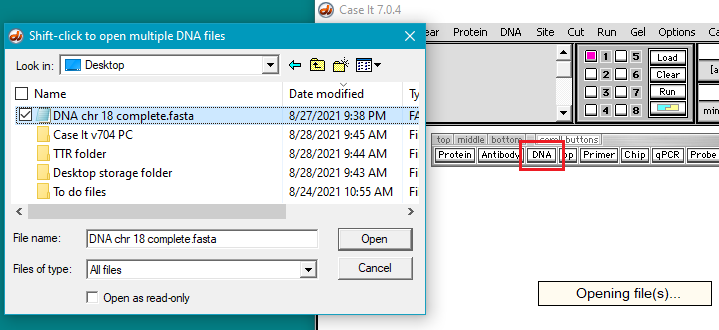
29. Open the DNA chr18 complete.fasta file in Case It v7.0.4 via the DNA button on the silver button bar. To do this you will need to navigate to the file on your desktop. That is, it will not be located in one of the Case It folders. It will take 30 seconds or longer for the file to open, due to its very large size, so do not do anything else until the ‘Opening file(s)‘ message disappears.
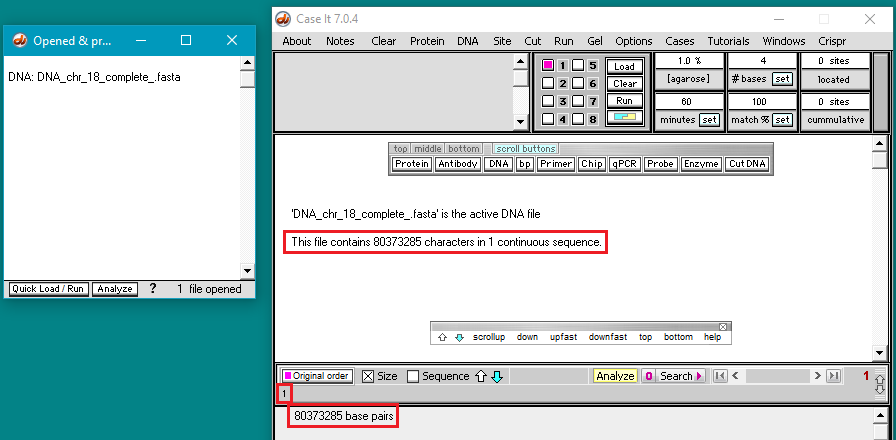
30. The size of the opened file is one continuous sequence of 80,373,285 characters, representing the complete sequence for chromosome 18. This is indicated by the message in the middle of the screen, and also in the field at the bottom of screen. The number ‘1’ just above the bottom number also indicates that a single sequence is present.
Warning! Versions of Case It v7.0.4 downloaded before 9/4/21 do not have error trapping to prevent the program from freezing if you attempt to see the actual sequence of this file (by clicking the ‘sequence’ button). Versions posted on or after 9/4/21 display an error message that “sequences larger than 2,671,815 characters cannot be displayed”.
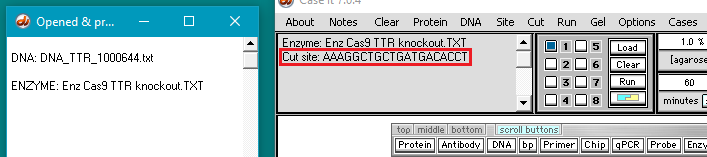
31. Click the Enzyme button on the silver button bar and open the file Enz Cas9 TTR knockout.TXT (inside Case It v704 PC > TTR folder).
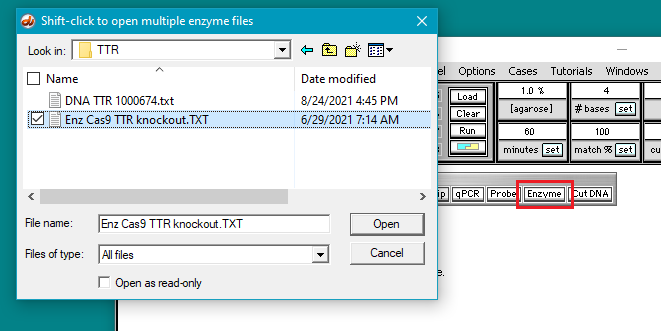
The enzyme file name appears in the Opened & processed window, and the target sequence for the enzyme appears in the field at the upper left-hand corner of the main screen (AAAGGCTGCTGATGACACCT).
Question: The sequence above would actually be on the ‘non-target’ strand of the DNA molecule, because that is what the Case It simulation will use to find the location on the chromosome 18 sequence (recall from Part 1 that the PAM, if present, must be on the ‘non-target’ strand). In reality, how does the CRISPR-Cas9 recognize the location, and how is it involved in cutting it?
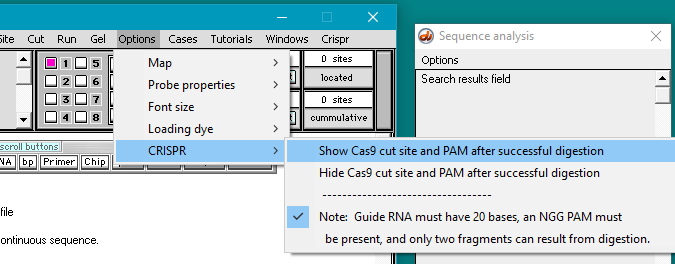
32. Use the Options menu and select CRISPR > Show Cas9 cut site and PAM after successful digestion.
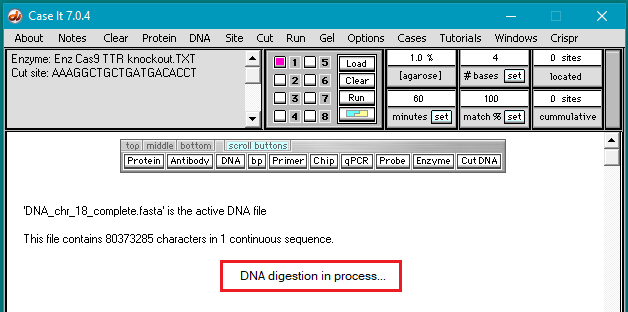
33. Click the Cut DNA button and select ‘with a single enzyme’. It will take 14 seconds or longer to make the cut, depending on the computer you are using [when the ‘DNA digestion in process..” message disappears, the digestion is finished].
When working with very large sequences the Case It simulation will be slow to respond to mouse clicks, so it is important to wait until processes are finished before continuing.
34. Two fragments result from digestion, indicating that a single cut site was found (vertical black line). Bases on either side of the cut site are shown in purple, with the PAM in red. The cut site is located just after position 31593004, matching the size of the first fragment as shown at the bottom of the screen. Case It v7.0.4 can display bases on either side of the cut site, but cannot display the complete fragment sequences because they exceed 2.67 million bp in size.
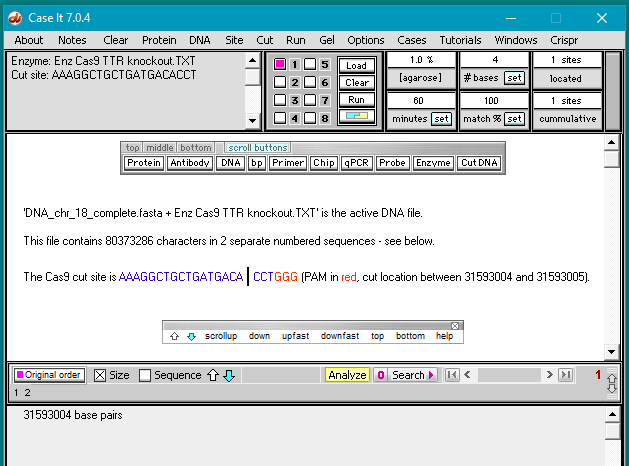
35. The number 31,593,004 is important to keep in mind since it is the location of the cut site on chromosome 18. This number will be used below and in Part 3.
Questions: Using this number as a reference, determine the exact location of the 5′-NGG-3′ PAM site.
36. We will not load and run a gel at this point, because fragments over 10 million bp in size cannot be separated on a real gel. They can be separated on a virtual gel using Case It v7.0.4, but since this is not realistic you should continue on to the next section, on use of the Genome Data Viewer.
USE THE NCBI GENOME DATA VIEWER TO VISUALIZE CAS9 TARGET SITE
Goals of Steps 37-44: To use the NCBI Genome Data Viewer to visualize the target site on the TTR gene, and to determine which exon is affected by Cas9 digestion. The Genome Data Viewer is a tool that allows you to see DNA sequences from all chromosomes in humans and many other animals. It shows the DNA sequences in their double-stranded configurations, exons and introns, mRNA and protein sequences, mutation sites, and other information. The screens can look overwhelming at first, but all we are interested in at the present time is finding the location of the Cas9 cut site, and the exon where this cut site is located. So that is what you should focus on for the remainder of Part 2.
37. To open the NCBI genome data viewer, either use the Crispr menu as shown below, or simply right click on this link and select ‘open in new tab’ or ‘open in new window’. That will enable you to easily go back and forth between these instructions and the Data Viewer.
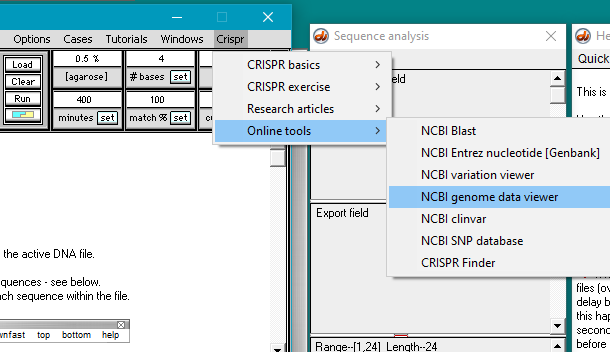
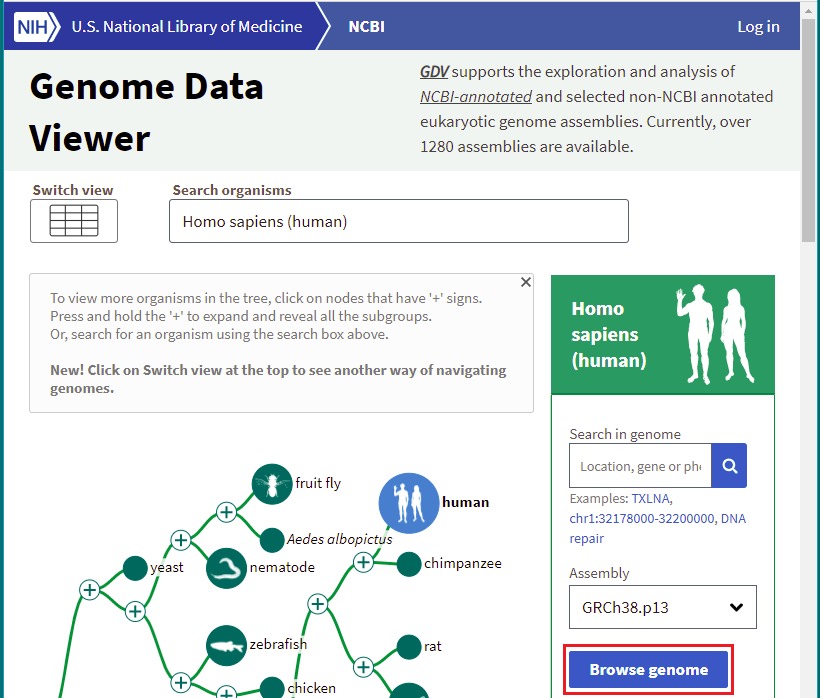
38. Click the Browse genome button.
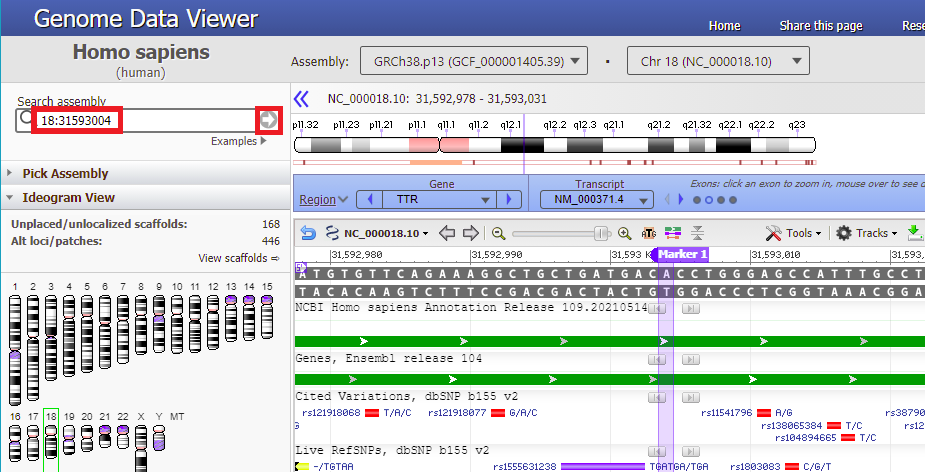
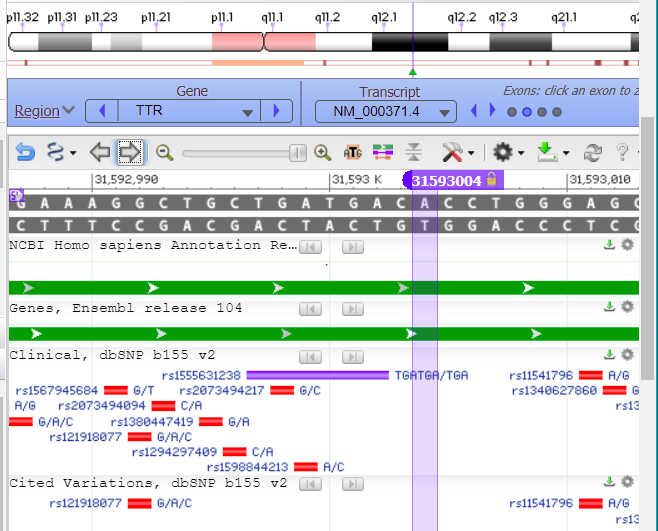
39. From Step 35 above you know the cut location (31593004) on chromosome 18. Copy and paste 18:31593004 into the Search assembly field, then click the arrow-in-circle button as shown below. A marker will appear at the cut location (the color of the marker may differ from what is shown below). A lot of information is displayed in the Genome Data Viewer, but all we are interested in right now is the DNA sequence in its double-stranded configuration.
Note: To paste, you’ll need to use the Control-V key combination (or Command-V on a Mac), as right-clicking may not work. Or, you can simply type the number into the Search assembly field. Since ’18:’ was used as a prefix, the viewer finds the sequence on chromosome 18 (in green box on left). Had you not entered this prefix, it would have searched for the sequence on chromosome 1.
40. Hold your mouse over the marker header (without clicking), and a box will appear giving the position and other options.
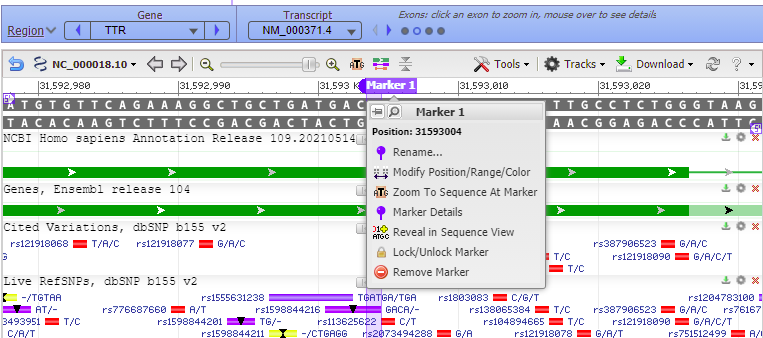
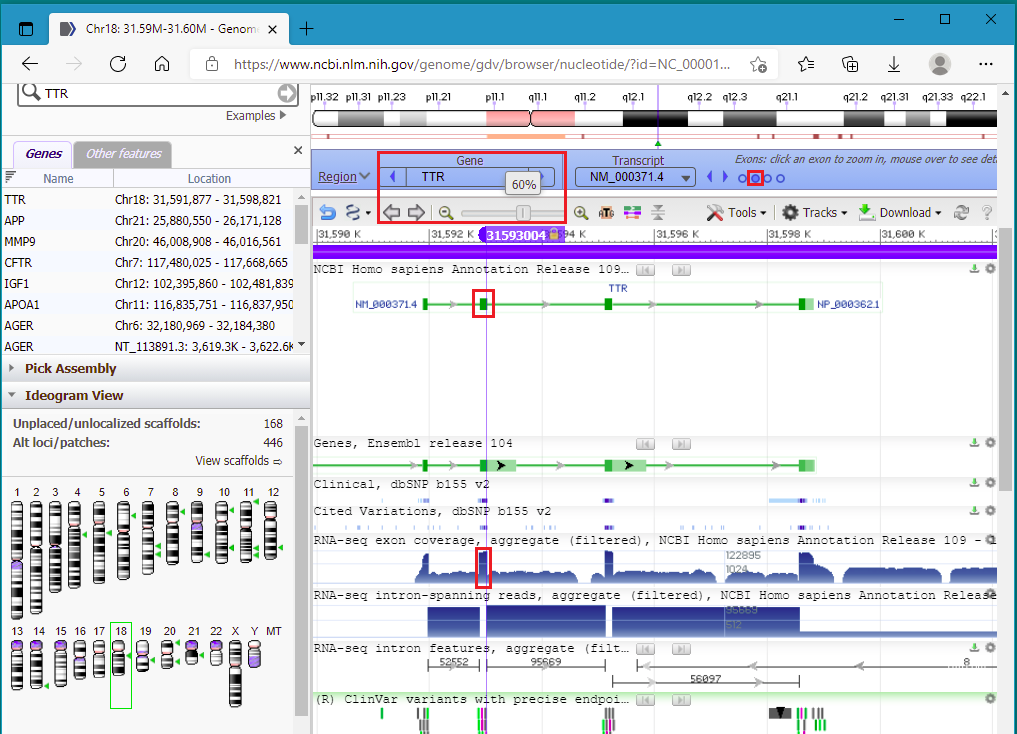
41. Drag the knob on the slider to zoom out to 60%. to show that the cut location is in exon 2 of the TTR gene (the second of four green boxes on the green line). The line represents the entire sequence for the TTR gene, and the four boxes represent the four exons on the gene. Clicking the circles on the purple bar allows you to zoom in to a particular exon.
42. Click on the second circle from the left in the red box below, to zoom into exon 2. The exon is highlighted in green when you hover your mouse above the second circle.
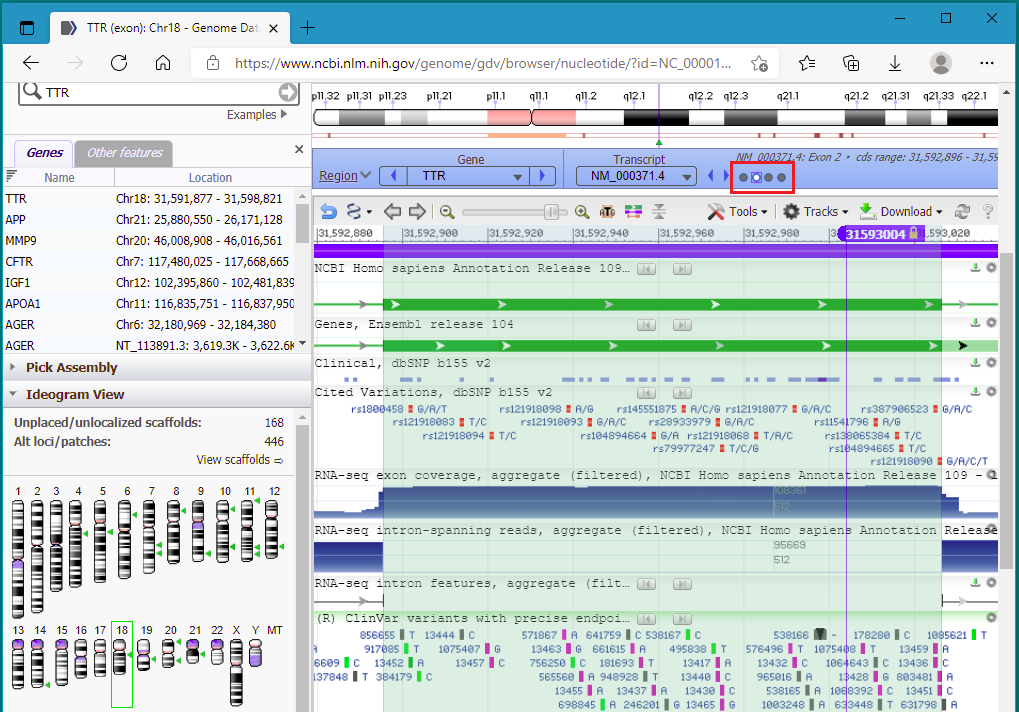
43. To zoom back into exon 2, click the button shown in the red box below…
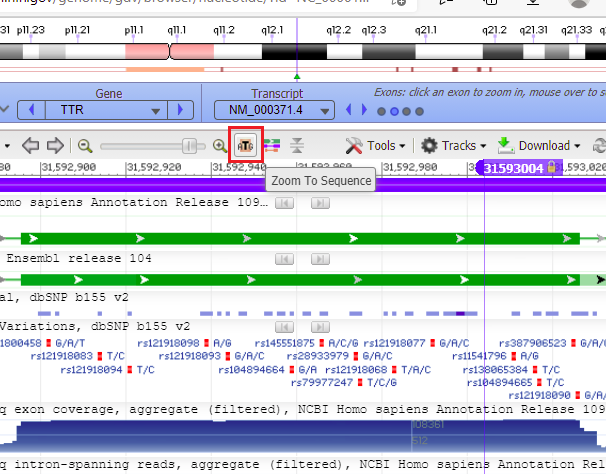
44. …and the sequence is again shown. You may need to drag the screen to see the cut location (or click the right and left arrow buttons).
Question: What is an exon? Why was it so important that the cut occur in an exon of the TTR gene, rather than in an intron?
Top of this page
Go to Part 1: Overview of ATTR, CRISPR, and Gillmore et al. 2021
Go to Part 3: Look for potential off-target effects of Cas9
Go to Part 4: Examine mutations of patients associated with the study
Go to Part 5: Analyze frameshift mutations in monkeys and humans